If There's a will, There's a way!    is my motto.
    "Discover a Simple Formula to Generate More Leads, Put Thousands in Your Pockets, and Build Your Online Business Lightning Fast..."
    Register Below To Receive E-Course

Fill Up The Form Beside To Start Your FREE E-Course.

Archive for the ‘ Wordpress ’ Category

How To Write Chinese Words At WordPress

write chinese
6 Comments

All the while I’m doing English blogging and although I notice I couldn’t write Chinese words at my blog I didn’t really go into this topic and find the solution. However, few days ago when I want to create a new chinese blog, I have no choice but to find the solution for it. Basically I get few ways to write Chinese words at wordpress but I’m going to share with you the easiest and most effective ways which can be done within few minutes.

Solution 1 (For advance users who understand FTP)

If you know how to use FTP, then this is the fastest way to get it done.

Follow the steps below:

1) Find the wp-config.php file from your server
2) Download to your computer (desktop)
3) Open the file as notepad
4) Find and delete the following two codes:
define(‘DB_CHARSET’,'utf8?);
define(‘DB_COLLATE’=,”);

5) Save it back to wp-config.php file
6) Upload to the server and replace the original file

Solution 2 (Without involving FTP – For normal users)

This is another way to solve the language problem without involving FTP and changing the code. Easy to follow and recommended if you are still new in blogging.

A) Login to your cpanel and go to phpMyAdmin (if you have more blogs host at same server, you will see all databases on the left).

B) Choose the database you want to change the language.
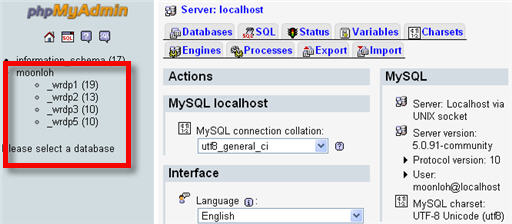
how to write chinese at wordpress
C) Go to
(1) wp_comments
(2) Structure
(3) Tick all the “Collation” shown something other than utf8_unicode_ci
(4) Click pencil icon

how to write chinese character at wordpress

D) Change all the “Collation” to utf8_unicode_ci (the last one) and “Save”
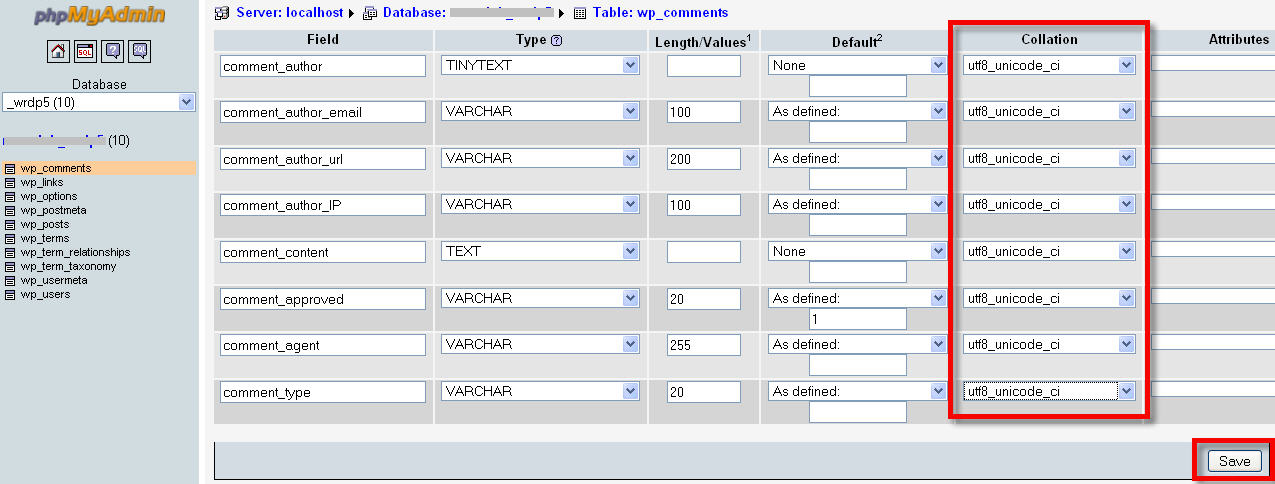
how to write chinese words at wordpress
E) Repeat the same for wp_links, wp_options, wp_postmeta, wp_posts etc at the colume (1)
F) Done! You can now post the Chinese character or other languages at your wordpress blog

This is my Chinese website done using Solution 2.

moon loh chinese website


Continue Reading

WordPress Plugin – All in One SEO Pack

wordpress-plugin
24 Comments

All in one SEO pack is a wordpress plugin you definitely needed if you are using self hosting wordpress blog. As stated in the title “all in one SEO”, the plugin helps in Seach Engine Optimization. Here’s are some features of the plugin:

  • Automatically optimizes your titles for search engines
  • Generates META tags automatically
  • Avoids the typical duplicate content found on WordPress blogs
  • For WordPress 2.7.1 you don’t even have to look at the options, it works out-of-the-box. Just install.
  • You can override any title and set any META description and any META keywords you want.
  • You can fine-tune everything
  • Backward-Compatibility with many other plugins, like Auto Meta, Ultimate Tag Warrior and others.

Step by step installation:

  1. Download the All in One SEO Pack at WordPress Plugin Directory.
  2. Upzip the file and upload into /wp-content/plugins/ directory.
  3. Activate the plugin through the “Plugins” menu in WordPress.
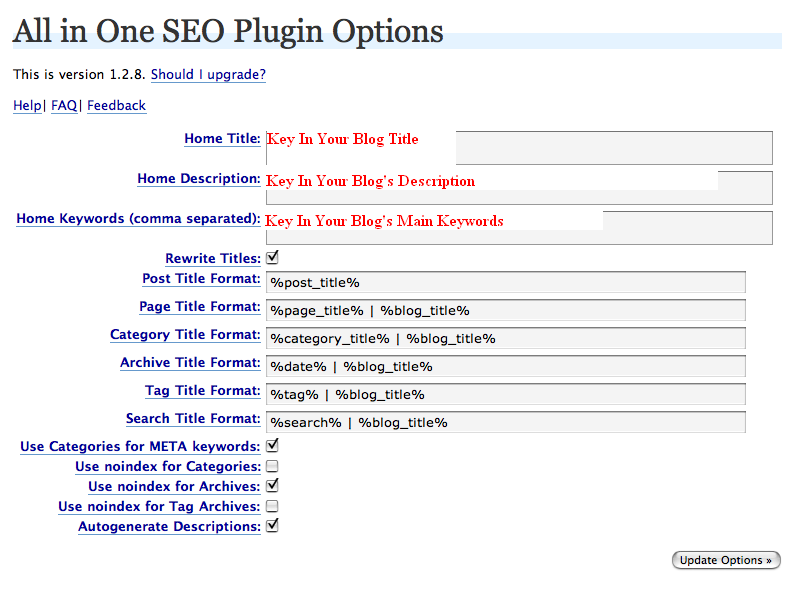
  4. Go to the “Settings” menu in WordPress and fill in the details as below.


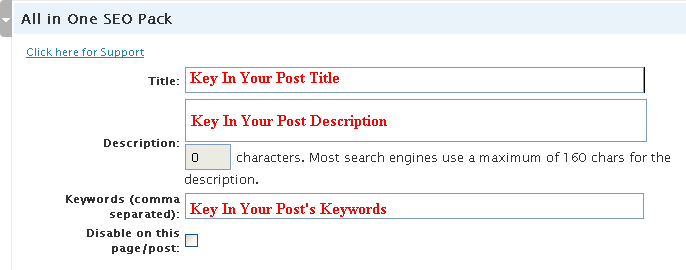
That is the main setting for your blog and for each single post, you need to fill in the details as below.

Continue Reading

How To Create Own Animated Tag

tag
1 Comment

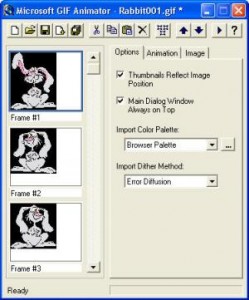
Some friends are asking me how I create my animated tag or button as I use at my Mompreneur site. Frankly, I just learnt how to do my animated tag two months ago from a friend and she told me to use a free software – MS GIF Animator.

This is a very simple and user friendly software that allow you to create your own animated button. You just need to download the sotware from MS GIF Animator and prepare yourself the photos you want to use. You need at least two photos to make your tag animated. Once you get your photos and software ready. You can now start to create your button.

Just import your photos and set the timing on how fast you want the tag to change from picture 1 to picture 2. Within few minutes you get your own animated tag ready. :)

Suggestion: Use photos with same file sizes so that to have better quality.

Tips: You can add words or website address inside the photos using Microsoft Office Picture Manager, Paint, Photoshop or other software you are familiar with before you import them into GIF Animator.

Continue Reading

Website Layout Problem At Internet Explorer (IE)

internet-explorer
7 Comments

I have encountered problems with my website layout at Internet Explorer (IE) for many times. I normally use Mozilla Firefox for my daily online but I would use IE for my websites testing.

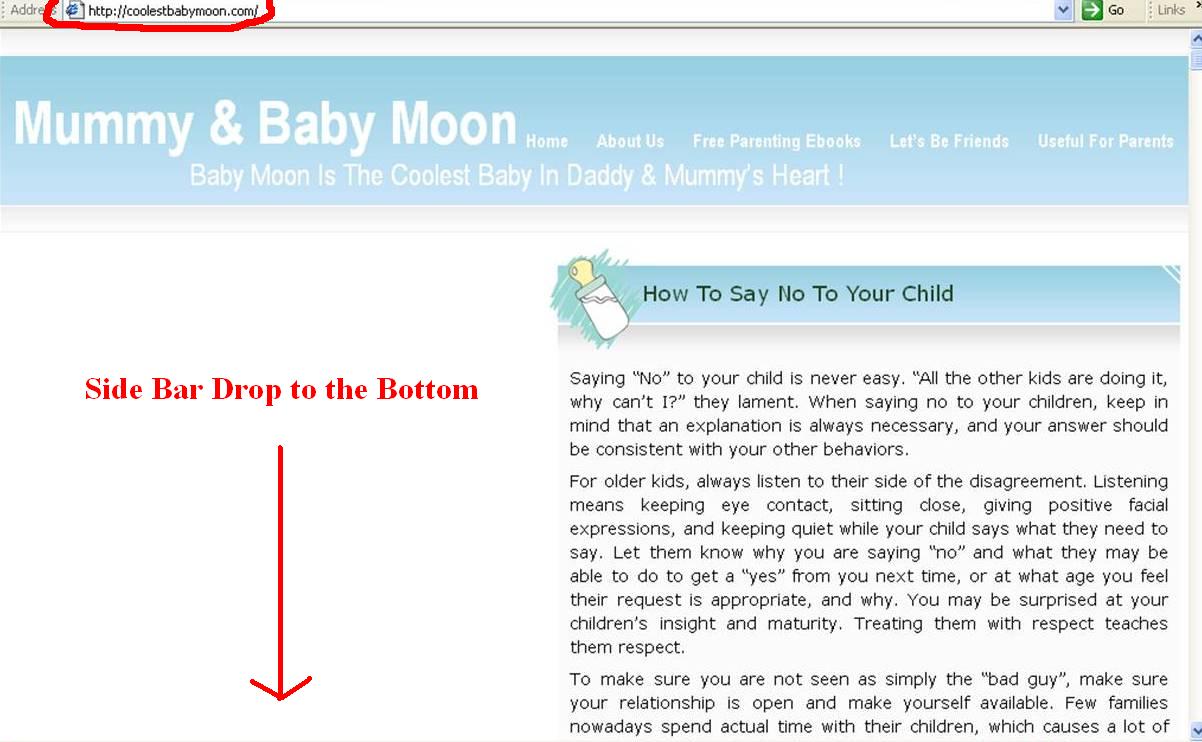
This morning my friend, Paul told me that one of my website’s sidebar dropped to the bottom of the posts. I quickly open my IE and found that my site looked like this:


But when I opened with my Mozilla Firefox, it looked just great!

I suddenly remember I just added in a new widget last week and this might be the cause of the layout problem. Since I have experiences on how to deal with this problem, it took me a few minutes for the small adjustment at the sidebar width.

And it looks normal and working good at IE now.

I suggest you to check your websites periodically to make sure the layout of your themes are working in order. Any new added in widget may cause the change of the layout at IE.

And if you encountered the layout problem, try the following ways:

  1. Check the size of your widget, does a particular widget too big in the width?
  2. If all your widgets’ width are ok, now check the sidebar width for your theme and try to reduce the size.
  3. You might need to try for few times and normally it works well after the adjustment at sidebar width.
  4. If it’s still not working, then this is time for you to check your header’s width if you are using custom header.

I hope the above tips help. Happy blogging! :)

Continue Reading

WordPress Themes with SEO Build-In

wordpress
3 Comments

I still remember when I started my self hosting websites on blogging, I used lots of time in choosing the WordPress themes for my blogs. Most of the themes just have little problems here and there and the most common problem is the layout doesn’t fix both the Firefox and Internet Explorer.

Sooner, I found that almost all WordPress themes aren’t designed with SEO in mind – in fact they are very poor for SEO.

6 SEO Problems Common In WordPress Themes – by Court


  1. Multiple use of the H1 tag. The H1 tag should only be used on each page of a site. Most WordPress themes use the H1 tag multiple times on each page.
  2. Excessive use of H2 tags. Most WordPress themes use H2 tags for almost everything in the sidebar. This causes H2 to be used nearly 10 times on each page. They should be used for the 2nd most important heading on each page, which is probably going to be your post title. The H1 tag should be used for the main heading on each page, which is probably the name of your site.
  3. Weak use of HTML title tag. On most WordPress themes, the HTML title tag appears as: the name of your site: category: post title. Since you will often have keywords in your post title, this is poor use of the HTML title tag. The post title should appear first.
  4. The code for the sidebar often appears above the content. This results in all of your pages looking the same in search engine listings. It also dilutes the power of your content and post titles, because they’re moved down in the code for each page.
  5. The comment section is poorly setup. Many of the themes use H1, H2, and H3 tags in the comments. This is a huge mistake that would lead to dilution of the intended H1 and H2s.
  6. Archive and category pages produce duplicate content. If full-text versions of the posts are shown here, it can cause post pages to show in Google’s supplemental index. I would set category and archive pages to show excerpts only, or add ‘noindex’ to their head.

One way to optimizes your WordPress blog for Search Engines (Search Engine Optimization) is to use the All in One SEO Pack.

The features of All In One SEO Pack:

* Automatically optimizes your titles for search engines
* Generates META tags automatically
* Avoids the typical duplicate content found on WordPress blogs
* For WordPress 2.3 you don’t even have to look at the options, it works out-of-the-box. Just install.
* You can override any title and set any META description and any META keywords you want.
* You can fine-tune everything
* Backward-Compatibility with many other plugins, like Auto Meta, Ultimate Tag Warrior and others.

Continue Reading

How to install Subscribe to Comments for WordPress?

wordpress-plugin
4 Comments

If you are using self-hosted wordpress, you might need this Subscribe to Comments plugin. This plugin is a robust plugin that enables your commenters to sign up for email notification of subsequent entries. So, why we need this feature? This is actually a good way to lead your commenters come back to you when there are other new comments added in for the particular post they commented before.

The steps for installing Subscribe to Comments Plugin:

  1. Login to WordPress official download website or you can click here
  2. Download the plugin
  3. Upload the file to your WordPress Plugin foler.
  4. Login to your WordPress admin and click the Plugins
  5. From the Plugins, activate the Subscribe to Comments
  6. Don’t forget the last step – setting for the plugin (enter your name and email address)

Your Subscribe to Comments is ready for use. You can check your website and the sentence of “Notify me of followup comments via email” appears at the bottom of the comment form.

Related posts:

Continue Reading

How to get WordPress API Key For the Akismet Plugin?

akismet
10 Comments

Recently I receive lots of spam mails for my blog. So I decided to use the Akismet Plugin. I always think that I just need to activate the plugin and all the things consider done. Well, when I really take a look into it, I found that they need a WordPress API Key to activate the Akismet Plugin.

I try to recall whether I have the WordPress API Key, and the answer is NO. So I need to get the API Key and obtaining the API Key for a self-hosted WordPress blog is quite confusing because I need to register an account at WordPress.com.

Why should I need to register at WordPress.com since I already have self-hosted blog at WordPress.org ?And the answer is I don’t need the API Key for WordPress.org but some plugins require it for the activation. If the plugin require the API Key, I will know when I activate it. In this case, the Akismet Plugin require the WordPress API Key.

Here are the steps to obtain the WordPress API Key:

  1. The dashboard will show that your Akismet Plugin is not activated.
  2. You will see “Please enter an API Key or (Get Your Key)
  3. Click the “Get Your Key”
  4. You will be directed to WordPress.com sign up page.
  5. Click the “Sign Up” tab at the right top corner and follow the instruction. (Please take note that they require a different username and email address and it should not be the same as self-hosted WordPress account)
  6. Click the “Just a username, please” and now your account is active.
  7. Check your email and click on the activated link.
  8. You will receive your WordPress API Key by email within a few minutes.

If you are not receive the API Key through email, you can always login to the WordPress.com and from the Global Dashboard, you should see your API Key number. Please do not share the API Key because it’s like a password.

Hope the above help.

Related posts:-

You see my “Moon” favicon?


Continue Reading

You see my “Moon” favicon?

create-favicon
9 Comments

I wonder you see my “Moon” favicon beside my website address? In case you didn’t, please see the icon in the title of my blog next to the URL. It just change from a “blank paper” to a “yellow moon” picture.

Favicon is from the word “favourite icon” and I always wonder how people make this icon so impressive for others to click on. Like google, yahoo, blogcatalog etc have their own favicon and it’s so obvious to attract a higher click through rate.

Until today, when I do my viewing at Warriorforum, a member asks about this question and I realised the name of the little icon is “Favicon”. I quickly google the step to install a favicon on a wordpress blog. Here’s I share with you the steps to install the favicon: -

  • Step 1 – go to Maxblogpress download the Maxblogpress Favicon WordPress Plugin
  • Step 2 – Upload the Plugin to your WordPress wp-content/plugin
  • Step 3 – go WordPress Plugin to activate the plugin
  • Step 4 – go WordPress Settings click on the MBP Favicon

From there, you can easily choose from variety of icons inside the file or you can choose your own favourite icon from your computer. Once the file is saved, your favicon will immediately set.

Additional - If you want to use own favourite icon, you need an additional program Adsen Favicon to convert your photo to icon file.


Continue Reading